
Table of Contents:
Testing the Agent Using Powershell
Overview
The DataBlend Agent allows data to be securely transferred between on-premise data sources and the DataBlend cloud-based integration and ETL engine.
The DataBlend Server queues jobs for the Agent. The Agent polls the Server to request queued jobs, processes those jobs, and returns the results to the Server.
System Requirements
The Agent can run on any OS that supports .NET Core. (Supported platforms are listed here.) It can connect to any data source that is accessible from its host system.
The Agent can be configured to run as a Windows Service; Microsoft recommends using PowerShell 6+ to perform this configuration.
Recommended Requirements:
-
Compatible with Windows (Windows 7, Windows 8.1, Windows 10, Windows 11, Windows 2008 Server, Windows 2012 Server)
-
Compatible with Linux
-
Java not required
-
1 GB hard drive space
-
At least 4 GB RAM
-
At least a 1.4 GHz 64-bit processor
-
Network connectivity: needs access to https://api.ml.datablend.com (see below)
API Access
The Agent will poll the DataBlend server for instructions, either to send or to receive data, therefore the agent must be able to reach the DataBlend API end points at https://api.ml.datablend.com. The API end point https://api.ml.datablend.com/version is public and can be used to confirm network access to the API. All other end points require authentication.
Configuration
The DataBlend Agent is configured via the DataBlend web interface. This includes configuring access on on-premise systems, scheduling jobs and defining queries.
Pre-requisites
When the Agent connects to the DataBlend server, it does so as a specific user, therefore a valid DataBlend account with access to the DataBlend web interface is a required to obtain and configure the agent.
Installation
Download the Agent files
-
Log in to your DataBlend account at https://ml.datablend.com.
-
Select the appropriate group for your Agent.
-
Create a new Agent.
Only one field - a free-text name - is required. -
Once the Agent has been created, file download links will be available on the right-hand side of the screen. Download the configuration file (agent.json) and the executable package appropriate for your OS.
-
The package name represents the agent build number. e.g. datablend-agent-win-x64-581.zip
-
The configuration file as downloaded should contain the correct configuration for your agent. For more information about the Agent configuration file, see The agent.json Configuration File.
Windows Installation
-
Create a directory for the Agent executable AND configuration files, for example c:\DataBlend\Agent.
-
Extract the Agent package to this folder, so that the path to the executable looks like c:\DataBlend\Agent\agent.exe.
-
Place the configuration file in the same directory as agent.exe.
Testing the Agent Using Powershell
-
Open Powershell and change directory to c:\DataBlend\Agent.
-
Run .\agent.exe.
The agent should start, display its version number.
-
Confirm the Agent has registered itself with the DataBlend server.
From the web interface, open the Agent configuration screen and look for the machine name and process id. -
Use Ctrl+C to terminate the Agent. The Agent will send a “Stopped” message to the DataBlend Server.


Configure the Agent as a Windows Service
These instructions have been prepared using Microsoft Documentation available here.Please refer to that documentation for more detail.
1. Open PowerShell 6 as an administrator
2. Run the following commands
$acl = Get-Acl "{EXE PATH}"$aclRuleArgs = "{DOMAIN OR COMPUTER NAME\USER}", "Read,Write,ReadAndExecute", "ContainerInherit,ObjectInherit", "None", "Allow"$accessRule = New-Object System.Security.AccessControl.FileSystemAccessRule($aclRuleArgs)$acl.SetAccessRule($accessRule)$acl | Set-Acl "{EXE PATH}"New-Service -Name {NAME} -BinaryPathName {EXE FILE PATH} -Credential {DOMAIN OR COMPUTER NAME\USER} -Description "{DESCRIPTION}" -DisplayName "{DISPLAY NAME}" -StartupType Automatic
3. {EXE PATH} – Path to the app's folder on the host (for example, d:\myservice). Don't include the app's executable in the path. A trailing slash isn't required.{DOMAIN OR COMPUTER NAME\USER} – Service user account (for example, Contoso\ServiceUser). This user account must have the “log on as a service” policy. Microsoft documentation.
{NAME} – Service name (for example, MyService).
{EXE FILE PATH} – The app's executable path (for example, d:\myservice\myservice.exe). Include the executable's file name with extension.
{DESCRIPTION} – Service description (for example, My sample service).
{DISPLAY NAME} – Service display name (for example, My Service).
Example
$acl = Get-Acl "C:\DataBlend\agent"$aclRuleArgs = "WIN-BG3GCL4FMO1\lesle", "Read,Write,ReadAndExecute", "ContainerInherit,ObjectInherit", "None", "Allow"$accessRule = New-Object System.Security.AccessControl.FileSystemAccessRule($aclRuleArgs)$acl.SetAccessRule($accessRule)$acl | Set-Acl "C:\DataBlend\agent"New-Service -Name DataBlend-Agent -BinaryPathName C:\DataBlend\agent\Agent.exe -Credential WIN-BG3GCL4FMO1\blendy -Description "DataBlend Agent" -DisplayName "DataBlend Agent" -StartupType AutomaticNOTE - If a new user is being created to run the windows service, please allow adequate time for the user to be synced before running the above commands. If the user is not yet synced, the commands will result in an error.
4. Start the Agent from the services.msc management screen.
Alternatively the windows service can be created in Powershell by using the following command. Properties can then be adjusted in the windows service after it has been created.
New-Service -Name {NAME} -BinaryPathName {EXE FILE PATH}
Uninstalling
Windows
Run the following command in PowerShell (5.1+) where {NAME} is the name supplied when created the service. If the service is running it will be deleted the next time it is stopped. If the service is stopped it will be deleted immediately.
$service = Get-WmiObject -Class Win32_Service -Filter "Name='{NAME}'" $service.delete()Errors and Troubleshooting
Permissions checks
Check if you have an admin access to the Windows server
-
Search for Administrative Tools -> Computer Management (Or right-click Computer in Windows Explorer -> Manage)
-
Local Users and Groups -> Groups
-
Click on the Administrators on the right and check if your Username is listed.
Check if previously installed Agent set as Windows Task
-
Search for Task Scheduler
-
In Task Scheduler go to Task Scheduler Library
-
Check information on the corresponding to the Agent task in the panel to the right (Right click on the task -> Properties)
Check if you have access to DataBlend platform
-
A client should be registered with Admin rights on the DataBlend platform.
Create a new Windows user (if required)
-
Search for Administrative Tools -> Computer Management (Or right-click Computer in Windows Explorer -> Manage)
-
Local Users and Groups -> Users
-
Right-click on the right -> New User -> create new user
-
Local Users and Groups -> Groups
-
Add newly created user to Administrator group
Create a new SQL Server user (Microsoft SQL Server Management Studio) to establish a SQL connection
-
Right-click User -> New User
-
Default schema – dbo
-
Owned Schema – None
-
Rule Members – db_datareader
Troubleshooting
If a Windows Agent encounters an error, it will log the error to the Windows Event Log.
Agent is already running on…
An Agent component configured on the Server will queue jobs for a single on-premise Agent. If an additional on-premise Agent attempts to register for the same queue, it will report the error “Agent is already running on <host> process id <number>”, and shut down.
To resolve:
-
Stop the first agent cleanly so that it will send a “Stopped” message to the server. This will unregister the first agent, permitting the second agent to register and process the queue.
-
Create a second Agent component thereby creating a second queue. Be sure to download the appropriate configuration file.
In the event that a registered Agent shuts down without sending a “Stopped” message to the server, the Agent can be manually unregistered from the queue.

Agent Service is not automatically restarting -
In cases when a Server is able to restart quickly the Agent connection will fail to connect because the service has not had enough time to drop the previous connection. To prevent this from happening Automatic delay restart is necessary.
To set up Delayed Start:
- Open the Windows Services Console
- Locate the Datablend/Agent Services
- Right-click the service
- Choose Properties
- In the General tab, select Automatic (Delayed Start) as the Startup type
To allow Delayed Start more time:
- Open Registry Editor
- Navigate to HKEY_LOCAL_MACHINE\SYSTEM\CurrentControlSet\Services\
- Click on the Datablend/Agent service and Right click on the right page
- Click New and select DWORD
- Label the new DWORD "AutoStartDelay"
- Set AutoStartDelay in milliseconds (decimal). E.G. 300000 is 300 seconds.
The agent.json Configuration File
Example configuration file:
North America Agent Example File
{ "agentId": "5040da0a-6ef2-415e-ab53-cf2d31caef51", "apiHost": "https://api.ml.datablend.com", "apiClientId": "2jnsvhlu2ns8am2ndm36lhin8vd", "apiClientSecret": "adaqrjveu5r2jo36u7er26k5tbur8722p3r3445hinsg78ii1dad", "tokenEndpoint": "https://api.ml.datablend.com/oauth2/token" }{ "agentId": "5040da0a-6ef2-415e-ab53-cf2d31caef51", "apiHost": "https://api.ml.datablend.co.uk", "apiClientId": "2jnsvhlu2ns8am2ndm36lhin8vd", "apiClientSecret": "adaqrjveu5r2jo36u7er26k5tbur8722p3r3445hinsg78ii1dad", "tokenEndpoint": "https://api.ml.datablend.co.uk/oauth2/token" }agentId
The agentId is the GUID identifier of a DataBlend Agent as configured using the web interface.
API Client Id & API Secret
-png.png?width=670&height=290&name=Screenshot%20(1499)-png.png)
The Data Agent connects to the DataBlend server as a specific DataBlend user. Each user’s individual Client Id and Secret can be obtained from the user’s DataBlend profile. To find the DataBlend user profile, click the user icon and click Manage Profile.
tokenEndpoint
The tokenEndpoint is the URL the Agent will use to authenticate itself to the DataBlend server.
North American tokenEndpoint
|
Prod |
|---|
EU tokenEndpoint
|
Prod |
|---|
Agent and API Version Numbers
Agent
The Agent announces its version when it starts. Running the Agent from a command line is the quickest way to identify the version number.
PS C:\DataBlend\Agent> .\agent.exe 2020-01-17 10:39:52.0495|INFO|Datablend.Agent.AgentService|DataBlend Agent 1.22.0-604API
The DataBlend API version number is available at the public endpoint:
https://api.ml.datablend.com/version
Security
Operating System Permissions
The DataBlend Agent processes inherit all permissions from the associated operating system user. On a Windows system, this will be the "Log On" user attached to the Windows Service. For the linux system, this is the owner and group assigned to the process.
Local File System
The Agent does not require local or network file system access aside from the local directory containing the Agent service and configuration file.
Configuration File
The client id and secret stored in the configuration file are used to generate an oauth token for communication with the DataBlend server. It is recommended to protect this information by limiting OS user access to the agent.json file. In the event the client credentials are compromised, the DataBlend user can generate a new set via the DataBlend UI and download an updated agent.json file.
Network Permissions
The DataBlend Agent host must be allowed to establish an outbound connection through the public internet to DataBlend’s API in order for the agent to retrieve queued jobs, transmit data, and pull data back in. Traffic is always initiated by the agent to the DataBlend server via TLS-encrypted TCP connection. No sessions are ever initiated from the DataBlend server back to the Agent.
Network access from the Agent host to the on-premise database host must also be allowed.
Whitelisting
Outbound traffic only
Domains
api.ml.datablend.com - Datablend API endpoint
Ports
443 : TCP; communicate with Datablend API using HTTPS
x : TCP; exposed on-prem database port (e.g. mysql - 3306, sql server - 1433
Database Permissions
Operations on the on-premise database are only performed by the DataBlend Agent when there is a pending job. Jobs are managed using the DataBlend web interface. The Agent itself does not have any knowledge about the schema of the database or how to query against it. Queries are provided by users when they create jobs through the DataBlend web interface.
The DataBlend Agent connects to the on-premise database with database user credentials. These are entered through the DataBlend web interface and are attached to the agent service. Credentials are encrypted with a AES-256-GCM algorithm and using a user-specific key only the Datablend application can access.
Dependent on business requirements, the agent may read and write data to and from the database. Database administrators have full control over the database permissions assigned to the database user. Limit the access to database objects to those necessary to fulfill the query provided in the DataBlend web interface.
If supported by the on-prem database service, database auditing can be configured to monitor operations being performed by the database user assigned to DataBlend agent jobs.
Related documentation:
https://docs.microsoft.com/en-us/dotnet/framework/data/adonet/sql/authorization-and-permissions-in-sql-server
https://docs.microsoft.com/en-us/sql/relational-databases/security/auditing/sql-server-audit-database-engine?view=sqlallproducts-allversions
https://www.mysql.com/products/enterprise/audit.html
Logging
Application logs are not written to disk locally, instead are pushed to DataBlend and can be viewed in the web interface.
Windows Agents log process information and errors (e.g. service start and stop errors) to the Windows Event Log.
Details
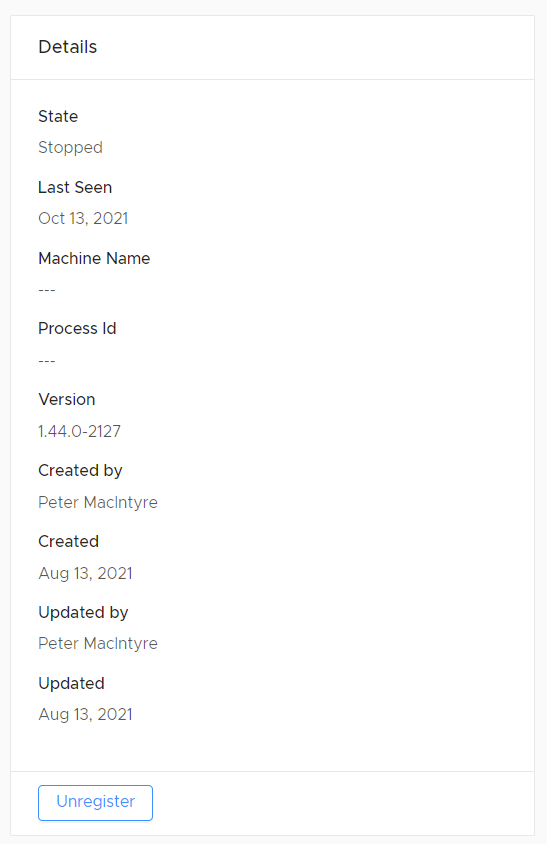
The Details section documents who the Agent was created by, updated by, and the corresponding times. This section also details the Machine Name, Process Id, and Version. This allows for easy tracking of multiple Agents.
Usage
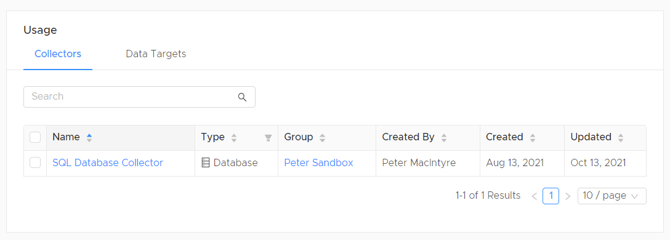
The Usage section can be utilized to conveniently locate collectors and data targets in which the created agents are used. Users may use the search bar so easily navigate through multiple collectors or data targets.
Saved Views
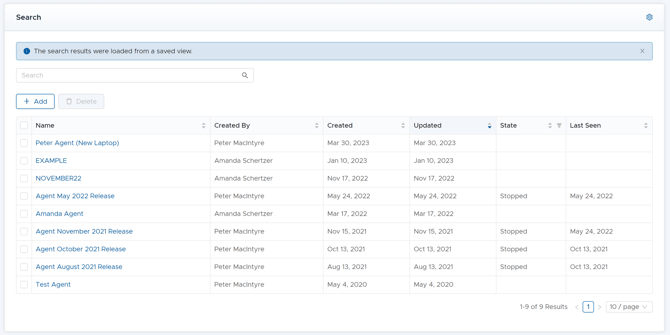
Saved views are a unique feature offered by DataBlend that allow users to quickly view filtered searches. Setting a saved view is simple. Click the gear icon in the upper right corner. A drop-down will appear with option to save the current view, restore the default view, or copy share URL. Copying a Share URL will allow other users with the URL to view the same saved view.