
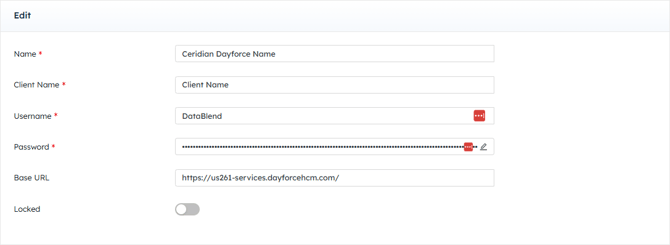
To make a Ceridian Dayforce connection, the following credentials are needed:
|
Field Name |
Required/ Optional |
Description |
|---|---|---|
|
Name |
Required |
Provide a unique name for this credential. |
|
Client Name |
Required |
Provide Ceridian Dayforce Client Name. |
|
Username |
Required |
Provide the Ceridian Dayforce Username. |
|
Password |
Required |
Provide the Ceridian Dayforce Password. |
|
Base URL |
Required |
Provide the required Base URL. This URL can be found by logging into Ceridian directly and then taking the URL from the home page and truncating it to align with the example below. Most commonly the URL will be this http://_______-services.dayforcehcm.com with the blank portion varying by client. (Example: https://ustest62e2-services.dayforcehcm.com) |
The Pay Group XRef Code is the unique reference code that identifies a specific pay group in Dayforce. It is equivalent to the Payroll Service ID (PSID) and is used throughout the system to link employees and payroll data to the correct group. The PayGroup XRef Code is a string value used as the Reference Code for the Pay Group. To locate it:
- Navigate to System Admin → Pay Group (or Payroll Setup → Pay Groups)
- Open the pay group record — the XRef Code field is displayed alongside the pay group name and description
- It can also be found on an employee's work assignment record under their assigned Pay Group
Entry Types in Dayforce Payroll are used when entering manual payroll adjustments or quick entries (such as bonuses, corrections, or off-cycle payments). To locate them:
- Navigate to Payroll → Quick Entry (or Check Entry / Manual Entry)
- Identify the code(s) that apply to your template and enter them into the CSV template exactly as they appear in Dayforce
- Entry Types are also configurable under Payroll Setup → Entry Types in the admin area
Step 1: Log into Dayforce
- Go to your Dayforce instance:
https://[yourcompany].dayforcehcm.com - Log in with your admin account
Step 2: Navigate to API/Integration Settings
- Go to System Admin → Configuration → API Management (exact path may vary by Dayforce version)
- Look for Connected Apps, OAuth Clients, or API Users
Step 3: Verify the API User Account
- Find the API user that DataBlend uses to connect
- Confirm the account is active and not locked, expired, or disabled
- Verify it has the correct roles and permissions assigned
Step 4: Confirm the API Base URL
- The DataBlend connector requires the
-servicessubdomain variant. Make sure the base URL configured in DataBlend matches this format, a mismatch here is a common cause of 401 authentication errors.
| Use | URL Format |
| Browser login | us261.dayforcehcm.com |
| DataBlend base URL | us261-services.dayforcehcm.com |