Overview
1. NetSuite Saved Search collector is based on Saved Search that is a powerful tool within NetSuite. A key advantage of NetSuite’s Saved Searches is that anyone can use them. NetSuite displays fields and join fields which allow to pull almost every piece of data from associated records by a Saved Search.
2. NetSuite Web Query collector is based on NetSuite Reports. Reports provide all the information needed for everyday use. They are easy to manipulate, visually appealing and present data in a way that is easy to understand for the business user.
3. NetSuite Bulk Export collector provides an option to collect a large number of resources, such as customers or employees, all at once. This collector allows to pull all available data for an object to explore fields and their values for integration but the resulting data is not easy to understand for the business user.
To "export" the script, click to open one. Ctrl + A to select the text or manually highlight it to copy and paste into, for example, Notepad. Also copy the JavaScript File name listed in the table including the "_(MM.DD.YY)" for versioning control and ".js" for file type. In Notepad, click on File > Save As, and paste the copied name.
|
JavaScript File |
Purpose |
Updated |
|
Collects Saved Search data into DataBlend, including ability to use filters. |
Feb 02, 2023 by Peter MacIntyre |
|
|
Enables the Bulk Export collectors. |
Jan 28, 2026 by Theresa Nguyen |
If you have uploaded a script from DataBlend into NetSuite before but the file name and API version doesn’t determine whether the script in NetSuite is the latest, compare the potentially outdated script in NetSuite versus the latest script version (from the table above) by navigating to Customization > Scripting > Scripts in NetSuite. Then, follow the below instructions.
1. Expand the filter to ensure TYPE is “RESTlet”, plus API VERSION and SCRIPT FILE is “All”. The SHOW INACTIVES box should NOT be checked.

2. Search for a key word that the file name would include, such as “save” for the Saved Search script and click Edit on it.
3. Note the API VERSION, then hover your mouse over the SCRIPT FILE box to Open (in a new tab) and click the “preview” link under the MEDIA ITEM section. Note that the SCRIPT FILE field in the Edit Script page allows you to create a new script, or select another one by clicking on the double-down arrows > List > search for the file to select > Save.

4. Ctrl + A or click-and-drag to manually highlight all text, then copy and paste into the left or right textbox of a free online text file comparison tool.
5. Open the latest script in the table above, highlight all text, and copy to paste into the other textbox of the free online text file comparison tool and click the button for the tool to compare both scripts. If there are differences, a new script file will need to be added in NetSuite.
Reminder: de-activate outdated scripts. See NetSuite Data Targets for more scripts and the below links to script-specific instructions for Collectors.
Please note that the information below will be removed from this page as it has been updated in the links above.
4 Required Steps Setting Up NetSuite Collection
1. NetSuite Saved Search Collector
- Create Saved Search in NetSuite
- Find the ID of the Saved Search
- Create RESTlet Script Record in NetSuite
2. NetSuite Web Query Collector
3. NetSuite Bulk Export Collector
4. Configuring the Collector in DataBlend
Create Saved Search in NetSuite
A Saved Search is a request for information. By specifying criteria and results information in NetSuite we are able to search through millions of records in NetSuite to pinpoint exactly what is needed. Saved Search can have many advanced search filters and results display options.
To create a Saved Search go to Reports -> New Search
.png?width=670&height=323&name=1%20(3).png)
DEFINE A SAVED SEARCH
Scroll down and select a record type for the search. For General Ledger we want to select a Transaction. We can also select Customer, Item, etc. There are different needs depending on the client, but most of the time we select Transaction.
.png?width=308&height=561&name=2%20(4).png)
We set up filters on the next page. Filters can be based on Dates, Accounts, etc.
.png?width=517&height=545&name=3%20(2).png)
Select Date range in the pop-up window.
.png?width=510&height=468&name=4%20(1).png)
Date can be selected as relative dates or specific dates.
.png?width=512&height=468&name=5%20(1).png)
We can select Start of this fiscal year. This works when we don’t have Balance Sheet by balances, but use Transaction for Balance Sheet by delta, Income Statement and Transactions. Otherwise we have to make sure that it matches to Balance Sheet by balances which is saved in Saved Reports. (Reports -> Saved Reports)
Click Set when selected.
.png?width=509&height=467&name=6%20(1).png)
Go into the Results tab, where we have all the fields that can be brought in.
.png?width=670&height=344&name=7%20(1).png)
We can Create Saved Search for now and see all the fields to decide which fields are required to add or remove.
.png?width=557&height=796&name=8%20(1).png)
Click Preview.
.png?width=524&height=611&name=9%20(1).png)
This is the preview of what we get. We got 2010 in Period as we based our Saved Search on Date and not on Period.
.png?width=670&height=256&name=10%20(1).png)
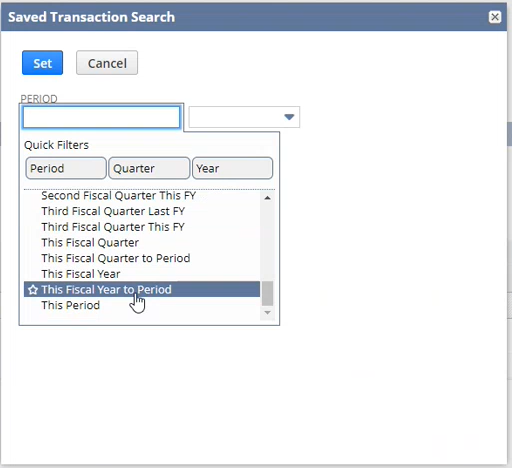
We can Return To Criteria and change to Period.
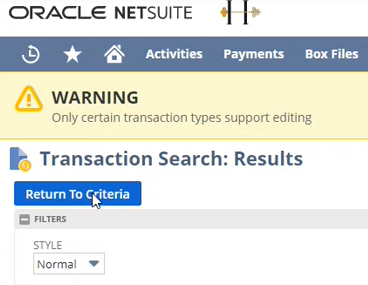

Periods work differently. In pop-up window select Period and leave the second search field blank. This will also going to get you this year data for This Fiscal Year to Period.
If we preview now we are going to get only this Fiscal Year. It depends on the client where they are going to look at dates or periods. A lot of them look at periods.
ADD/REMOVE FIELDS
Return To Criteria -> Results tab. To remove field, click on it and select Remove.
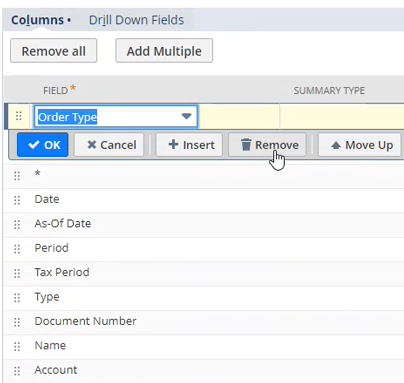
LABELS
If there more then one field with the same name, we have to bring labels into the DataBlend. Name can be a name of the field for Account Name, Customer Name or Vendor Name. Search at the bottom of the list (scroll all the way down) for the fields with three dots.

In pop-up window select Name.

In Custom Label call it Account. When it comes into the DataBlend it will be called Account, instead of Name. Best practice is to have custom label for all the fields. It will guarantee getting the right data.
.png?width=670&height=311&name=19%20(1).png)
FREQUENTLY USED FIELDS
This depends on a client. Sometimes their structure in NetSuite can be different to somewhere else, like Account can be just part of the Account Name and needs to be concatenated with something else. A client will tell what fields we need to bring in. We need to ensure that all columns for the fields out of NetSuite that are going to make up the fields for a destination system.
-
Something for Account (Account Number Account Name, etc)
-
Something for Date (Period, Date, etc)
-
Dimensions (Customer, Vendor, etc.)
-
Document Number, Type (sometimes)
-
Accounting Period Field (Start and End Dates are located there)
-
Memo, Transaction Type (Check or Credit Card) - usually for Transactions
-
Level (if it’s going into Adaptive)
-
Location (part of the Level process, select Name (no hierarchy) to have the most granular piece)
DEFINE AUDIENCE FOR SAVED SEARCH
DataBlend uses OAuth2 and a User/Password combination for authentication. In this case, the reports must either be publicly available or accessible to the authenticated user. If you are the Admin user who confirmed the NetSuite connection to DataBlend and you either own the report or have access to it, you should be able to pull the data from the report into DataBlend.
Go to the Audience tab and select all the fields as shown in the screenshot below. When selecting "Public", Department and Subsidiaries might become unchecked. This is be okay, but we need to ensure that all departments are included. Once confirmed, click Save.

By default, only administrators and a saved search's owner (creator) can edit its definitions. Users can run and view results of a public saved search.
LINKS TO EXTERNAL RESOURCES
Find the ID of the Saved Search
-
Use the Report → Saved Searches menu option to open the list of NetSuite OpenAir saved searches.
Identify the internal id of the search results to be collected by DataBlend.

Create RESTlet Script Record in NetSuite
DataBlend uses NetSuite RESTlet functionality to run a saved search and collect the results. For this to work, a NetSuite administrator must create the saved search and RESTlet, and then a DataBlend user can configure the collector.
These instructions assume the Saved Search has already been configured.
Configure the RESTlet
-
Download the DataBlend saved search RESTlet from the link above.
-
From the Customization menu, create a new script.

-
Mouse over the downward chevrons and then click the '+' button.

-
Enter a file name, select the script file downloaded earlier and save the record.
Important! File name should have .js at the end of the name.
-
Create the script record.
.png?width=467&height=263&name=image-20200819-202157%20(1).png)
-
Enter a name for the script.
Important! File name should have .js at the end of the name.
-
Enter GetSavedSearch into GET FUNCTION field. This step only applies when collecting Saved Searches.
 For bulk-export.js and bulk-import.js scripts POST FUNCTION should be selected.
-
Save and Deploy the script.

-
Set the deployment status to Released and set the security access as appropriate, then save to deploy the script.

- Note the External URL for the DataBlend collector configuration.

2. NetSuite Web Query Collector
NetSuite Web Query collector is based on NetSuite Reports. Reports provide all the information needed for everyday use. They are easy to manipulate, visually appealing and present data in a way that is easy to understand for the business user.
Note: You don’t need to create NetSuite credentials in DataBlend platform to collect NetSuite data with Web Query Collector.
Add a New Collector with the following fields:
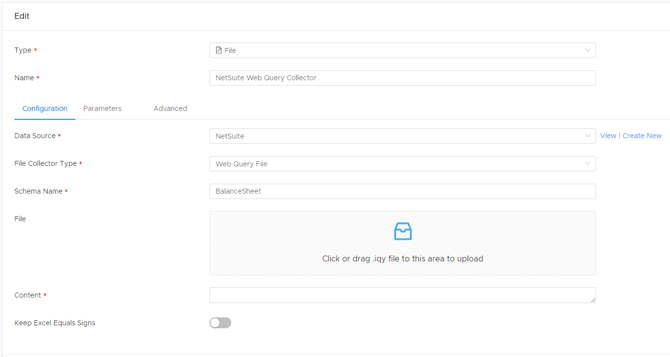
Complete the configuration fields:
|
Field |
Required/Optional |
Comment |
|---|---|---|
|
Type |
Required |
File |
|
Name |
Required |
Free text |
|
Data Source |
Required |
Select from list of configured data sources or create a new one. |
|
File Collector Type |
Required |
Web Query File |
|
Schema Name |
Required |
Free-text. Used when writing queries against the collected data. If a schema with this name does not already exist, one will be created under the selected data source. |
|
File |
Required |
Click or drag .igy file downloaded from NetSuite by “Export - Excel Web Query” |
|
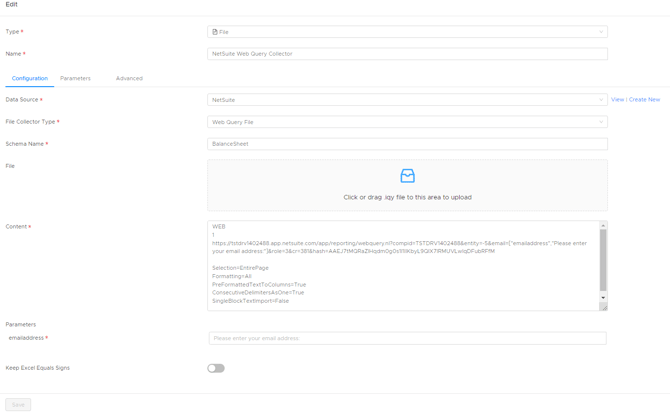
Content |
Required |
Will be populated once .igy file uploaded. Alternatively, open .igy file in text editor and copy/paste its content into this field. |
|
Parameters email address |
Required |
NetSuite Admin email address |
Parameters email field appears when .igy file is uploaded and Content field populated. Enter email address of NetSuite Admin and Save the collector.
Create Web Query Report in NetSuite
A report in NetSuite is a saved set of data results. NetSuite allows customizing most standard reports using Report Builder. You can modify the appearance and information from reports with numerous features to create the perfect report: add new columns with related information gathered from fields in the system, add simple formulas to calculate values into the reports, set filters to classify the data and sort the data in different ways.
1. To create a Report go to Reports -> New Report
.png?width=433&height=278&name=2%20(5).png)
2. Select the type of report you would like to create from the options
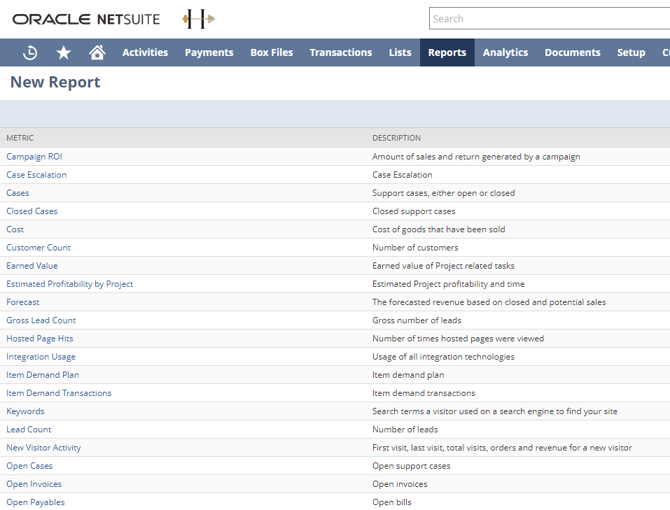
3. Enter Report Title and select the preferable and click on More Customization.
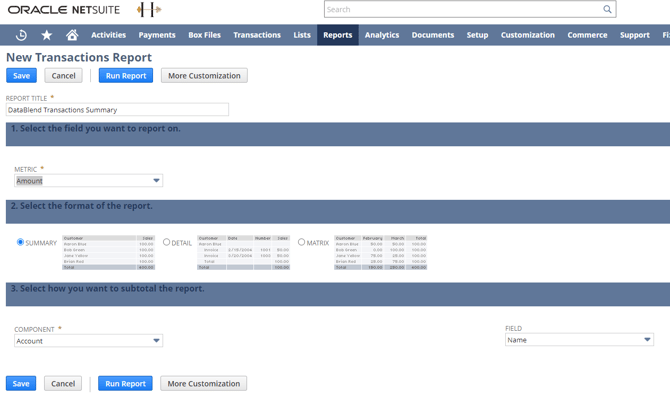
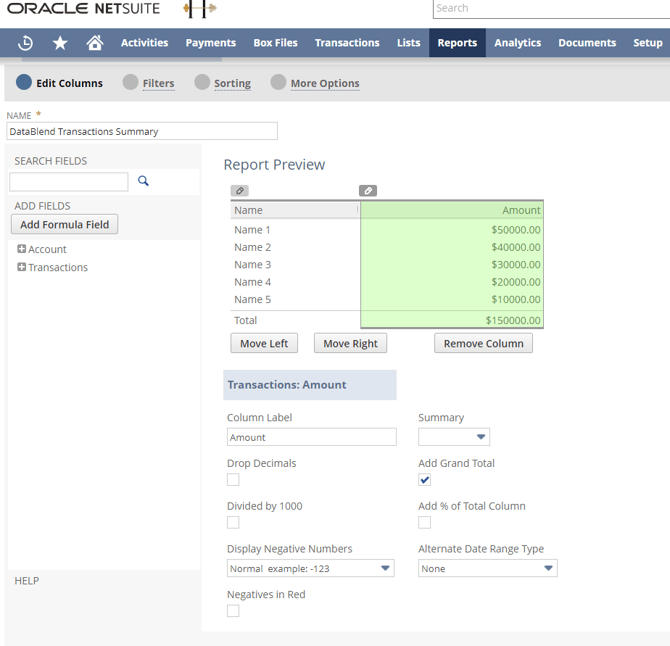
4. Customize your report by adding more columns, formulas or filters. Available columns can be seen by expanding +Account or +Transactions on the left. Formula fields can be added by clicking on Add Formula Field.
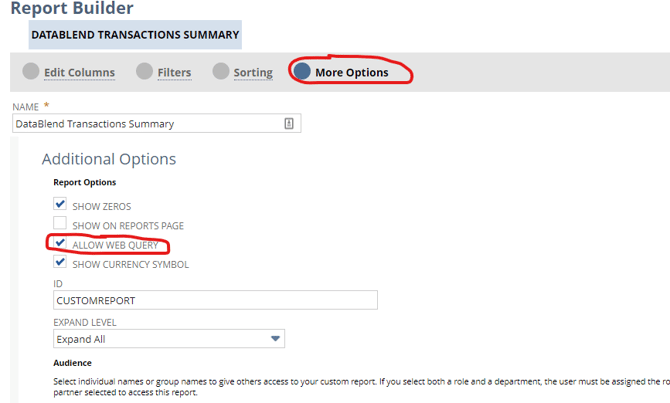
5. Click on More Options and select ALLOW WEB QUERY box. Save the Report.
6. Look for the “Export - Excel Web Query” icon at the bottom right of the page. Click on it to download .igy file. Note the location where the file downloaded.
.png?width=568&height=151&name=1%20(4).png)
The next step is to create a NetSuite Web Query collector in DataBlend.
3. NetSuite Bulk Export Collector
NetSuite Bulk Export collector provides an option to collect a large number of resources, such as customers or employees, all at once. This collector allows to pull all available data for an object to explore fields and their values for integration but the resulting data is not easy to understand for the business user.
Configuring the Collector in DataBlend
-
Add a new collector.
-
Complete the configuration fields and save the collector.
|
Field |
Required/ Optional |
Comments |
|---|---|---|
|
Type |
Required |
NetSuite |
|
Name |
Required |
Free-text |
|
Data Source |
Required |
Select from list of configured data sources. Data sources are configured separately. |
|
Schema |
Required |
Free-text. Used when writing queries against the collected data. If a schema with this name does not already exist, one will be created under the selected data source. |
|
Credential |
Required |
Select from the list of configured NetSuite credentials. |
|
NetSuite Collector Type |
Required |
Select Bulk Export. |
|
Script URL |
Required |
The URL of the deployed RESTlet. |
|
Record Type |
Required |
Select record type from drop-down list you want to collect data from |
|
Filters |
Optional |
Add filters to filter out records. |
Filters operate according to the NetSuite documentation with the ability to “AND” and “OR” multiple filters together. Parameters are supported using notation.
Filter examples:
-
[["lastmodifieddate", "after", "12/21/2022"]]
-
[["account", "is", "23"]]
- [["line","greaterthan","0"], "and", ["trandate", "onorafter", ""]]
4. Configuring the Collector in DataBlend
-
Add a new collector.

-
Complete the configuration fields and save the collector.
|
Field |
Required/ Optional |
Comments |
|---|---|---|
|
Type |
Required |
NetSuite |
|
Name |
Required |
Free-text. |
|
Data Source |
Required |
Select from list of configured data sources. Data sources are configured separately. |
|
Schema |
Required |
Free-text. Used when writing queries against the collected data. If a schema with this name does not already exist, one will be created under the selected data source. |
|
Credential |
Required |
Select from the list of configured NetSuite credentials. |
|
NetSuite Collector Type |
Required |
Select Saved Search. |
|
URL |
Required |
The URL of the deployed RESTlet. |
|
Search Id |
Required |
The Internal Id of the saved search. |
|
Filter Expression |
Optional |
Syntax example - [["trandate","after","01/01/2023"],”and”, ["trandate","before","12/31/2023"]] |
|
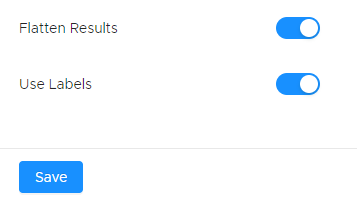
Flatten Results |
Optional |
Default is true. Gives a cleaner version of the collected data. |
|
Use Labels |
Optional |
Brings in labels that were set up in Saved Search |
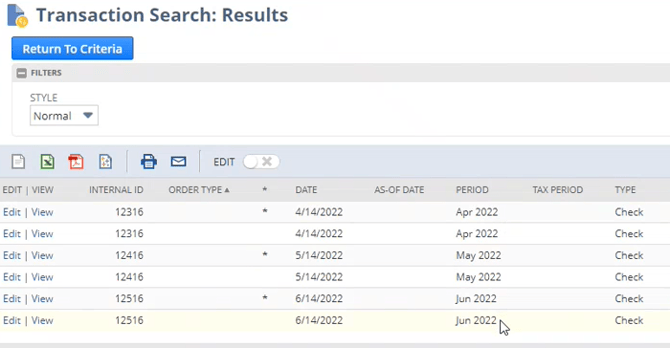
Search ID can be found in NetSuite in the URL field for Saved Search results.
.png?width=670&height=430&name=index%20(2).png)
-
Use the Collect Now button to run the collection and initialize the schema.
Flattening Results
Some columns from a NetSuite Saved Search will be returned as embedded objects; a single column may itself include several related fields. In the example below, the collector’s Flatten Results value is “false”; in the collected data account and department are embedded objects while amount is a simple value.

Flattening the collected data places each field of each embedded object in its own column making it easier to query. In the example below, the collector’s Flatten Results value is “true”; the nested fields from each object are placed in their own columns.
Flattening the results can give a cleaner version, but sometimes can omit some columns from the collection. The following steps are recommended:
-
Run collector with the Flatten Results OFF.
-
In the Advanced tab change the first field Schema Update Type to Add Only.
-
Set Flatten Results ON.
-
Collect again.
Once the data is collected, it needs to be checked if all the required columns are present. If some columns are missing, but the column name are known, then they can be added manually in the schema. This can be avoided by firstly bringing in the unflatten data, and then flatten it.
 Using Labels
This setting will collect fields which have labels added. Note that the fields without labels will not be included in schema. If the Schema Update Type is set to Add Only in Advanced tab, the fields will stay in schema, but won’t be populated with values. When collecting data with Use Labels enabled make sure that all the required fields in Saved Search have labels added.