
Users must follow 2 steps to connect to DataBlend.
Users must set up an Integration Record before creating the DataBlend Credential.
Integration Record
The integration record is necessary in order to connect DataBlend to NetSuite using token-based authentication. An Admin user is required on the client side to create an Integration Record in Netsuite. The steps below will walk through how to set up an Integration Record.
-
Go to Setup > Integration > Manage Integrations > New.


-
Enter a name for your application in the Name field.
-
Enter a description in the Description field, if desired.
-
Select Enabled in the State field.
-
Enter a note in the Note field, if desired.

-
On the Authentication tab, under Token-based Authentication:
|
Field |
Value |
|---|---|
|
Token-based Authentication |
True |
|
TBA: Issuetoken Endpoint |
True |
|
TBA: Authorization Flow |
True |
|
Callback URL |
|
|
Authorization Code Grant |
False |
7. Copy/Paste Callback URL into the field in NetSuite
.png?width=688&height=163&name=25%20(1).png)

8. Click Save.
9. Note the Consumer Key and Secret
Warning: For security reasons, the only time the Consumer Credential values are displayed is on the confirmation page. After you leave this page, these values cannot be retrieved from the system. If you lose or forget the client ID and client secret, you will have to reset them on the Integration page, to obtain new values. Treat these values as you would a password. Never share the client ID and client secret with unauthorized individuals and never send them by email.
9. Complete the configuration for a DataBlend
DataBlend Credential Configuration
Third party access to NetSuite via OAuth 2.0 requires a NetSuite integration record. When the integration record is configured, a Client Id and Client Secret are displayed. These must be entered as part of the DataBlend NetSuite credential.
-
Add a new credential.
-
Set Type to NetSuite.
-
Complete the fields:
|
Field |
Required |
Comments |
|---|---|---|
|
Name |
Required |
Descriptive name for the NetSuite account DataBlend will connect to. |
|
Account ID |
Required |
The Account ID forms part of the NetSuite URL. e.g.
Account ID will be: tstdrv1543216
Trouble Shooting Distinct Account IDs: This is only necessary when the URL includes a dash or an underscore. In this case, the Account ID must be changed to include an underscore. Example: Account-123 → Account_123 It is important to remember to use the original hyphen when establishing the connection via the ‘Connect to NetSuite’ button and after the token populates, change the hyphen to an underscore for ongoing use. |
|
Subdomain |
Required |
Please note that Subdomain is often the Account ID. Only in rare occurrences are subdomains different. |
|
Consumer Key |
Required |
Obtained when the NetSuite Integration Record is created. This value is masked once the credential is saved. A Consumer Key is established when creating the Integration Record above. |
|
Consumer Secret |
Required |
Obtained when the NetSuite Integration Record is created. This value is masked once the credential is saved. |
|
Access Token |
|
Automatically populated after the credential is saved and the user clicks Connect to NetSuite. |
|
Refresh Token |
|
Automatically populated after the credential is saved and the user clicks Connect to NetSuite. |
4. Save the Credential.
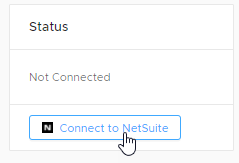
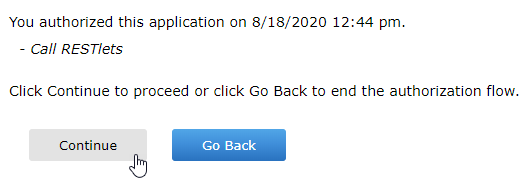
5. Click Connect to NetSuite to obtain access and refresh tokens.

You will be asked to confirm DataBlend’s access to the NetSuite account.
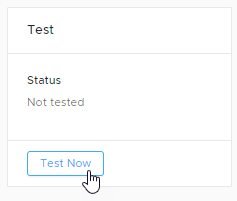
6. Click Test to confirm access to NetSuite.

Example:
-20220706-174048.png?width=688&height=259&name=Screenshot%20(508)-20220706-174048.png)
Troubleshooting:
Make sure that settings REST WEB SERVICES, TOKEN-BASED AUTHENTICATION and OAUTH 2.0 are Enabled in Setup → Company → Enable Features → SuiteCloud.